Featured Member

Latest Vexel

Links
Vexel Article - Fun with Stroke Path - by Linda
 A very popular trend in vexelling is using this thing called "stroke path". This article will explain exactly how to use this tool as well as show a few of it's many uses.. and it's not just monotonous hair strands!
First off, before you start reading this, this tool/option is only for Adobe Photoshop. I have no idea if programs like PSP have an option like this.
I use Photoshop 7 but other versions mostly have the same options even if they are in different places - just look around and use the help file if you can't find something :)
Ok let's get our stroke on!
First up, I will explain how to make a basic "stroke path". Open up Photoshop and make a new document. Fill the background with black (or white or pink, I don't care) and then create a new layer and set your foreground color to something like white (anything that can be seen on your background).
 First thing we do is set our paint brush - this is what we stroke with. You can also stroke with the pencil, eraser, dodge/burn and many other tools, but for now, we're sticking with the paintbrush. Click on your paintbrush tool. Up the top left hand corner, the options for your paintbrush will appear. Put your paintbrush on 3 and make sure your other settings are like this: (click for full view)
  Next, on your toolbar, select the pen tool. Now, up the top of your screen the options for the pen tool will appear - Your options should be set as follows: (click for full image)
 If you ever come across a problem where your "stroke path" option is
greyed out, come back to this section and make sure your settings are right!
Go to your image and make a simple curve. If you've never used the pen tool before, it may take some getting use to. I made a little animation showing how to make a simple curve - click to view it. Just click once where you want the curve to start and click and hold where you want it to end - then drag your mouse around slowly until you get the curve you want, then let the mouse button go! Simple :)
 Once you have your curve, right click and select "stroke path".
Sometimes this is greyed out or not working. A few troubleshooting tips to find out why it is for you:
- Your pen tool settings are wrong - check the image above to make sure your settings are exactly the same - you must be using paths not shape layers!
- You must have a layer selected which is not locked and is visible.
- If you can select stroke path but can't see anything afterwards, make sure you are using a color that can be seen on the background and that the layer is at 100% opacity as well as your brush. Also press control+d to deselect anything you might have accidentally selected.
 Ok, once you click stroke path another box will pop up. Select "brush" from the drop down menu and make sure "simulate pressure" is checked.
 What does simulate pressure do? It tapers off the edges - Similar to if you were using a real paintbrush, if you took pressure off the brush, your line would be thinner.
An example is to the left.
There you go! Your first stroke path :D
But wait! There's more! The rest of the options are really all in the brush you choose.
Here is an example of how to make a brush do exactly what you want it to do:
Select the paintbrush tool. At the top right of your screen there will be a tab called brushes, click that.
You can fiddle around with the settings of your brush here. There are just so many options so I won't go through each one, they all show in the preview so you can see exactly what is happening. Try using the following settings:
Diameter: 9px - Hardness: 100% - Spacing: 220%
Then down the side click "Shape Dynamics"
Size Jitter: 100% - Minimum Diameter: 1%
Next click "Scattering"
Scatter: 550% - Count: 1 - Count Jitter: 15%
Now draw a path and stroke path using your paintbrush... spotty :D This kind of thing would be good for .. well, not much (glittery bits perhaps?), I was just showing what you could do.
The Roundness setting is a good one for hair strands.
 A favourite of mine is to use a 1px brush set on a spacing of around 400% - this will give you a clean dotted line. This kind of thing is *great* for stitching in clothes or in this case, shoes (click for full view).
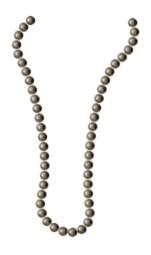 We can't forget the beads! Just play with the spacing of your brush so that the circles are just touching. Then draw your bead path (preferrably around someone's neck.. not just in mid air like I have done) and stroke path :)
To shade, I usually create a new layer, select the layer transparency of the beads then go Select > Contract and this part totally depends on your bead size - for this one I did about 3 I think. I filled that with white and set the layer mode to soft light. I then shifted the layer a little to the left and up using my keypad. I then duplicated that layer. Inverted it (control+i - makes it was black) and nudged it to the bottom/right a little. Then I drew little white dots on each. It's not perfect and if you want something more realistic there would be a lot more work involved with the bead placements and shading, but it works :)
Now. On to the hair. This is what people mostly use stroke path for. Here are a few of my tips..
 |
Use different sized and colored brushes. Drawing every single strand using the same brush on the same color is mighty boring.. not just for you but for the final product. I generally start with a fat brush (sometimes up to 10px depending on the size of the image) then work my way down to a 1px brush. Always use more than 2 colors.. unless you're doing black hair or something. You see my quickie to the right.. I did that in less than 5 minutes - so imagine the nice hair you could do in half an hour :) It looks much nicer than the bland stripes on the left. |
 |
- You don't always have to have "simulate pressure" on. Sometimes you will find there is a time when you don't want the ends to taper. You will also come to find that sometimes you want 1 end to fade off and the other end to be normal - in this situation I normally turn off simulate pressure and just draw my own end with the pen tool.
- Remember that generally, hair falls in clumps and you can't usually see every strand from root to tip.
- Don't forget to go around the edges and ends and do the "whispy bits" - unless the person has a can of gel on their head, there will be whispy bits :D I usually leave this till last.
- You can also use stroke path for eyebrows and eyelashes.. just be very careful :)
And lastly, remember this is all personal preference! Some people don't like this method at all, others love it. Some might like to see only 10 snake-like strands of hair used.. it's cartoony! Others like to vexel hair the same way they do with skin.. and others just fill the whole thing with black and call it a day. It's all up to you *of course* I just thought I would give a few tips and help people who want to explore this stroke path.. thing :D
Comment on this article
You must be registered and logged in to comment.
Comments (32)
| krsh3 | thanks please more |
| Sayuri |
thanks for sharing! i didn't realize you could do this in photoshop. (very simple in illustrator) but you know what would make my day? if the photoshop stroke path function would give us vector shapes instead of un-resizable raster shapes. (excuse my poor terminology..) b/c stroke is just a property of paths in illustrator and it's much easier to add/edit/delete strokes. ADOBE MAKE THIS HAPPEN! :D edit: i hope that it can't already be done in photoshop.. because then i'll feel very very stupid. edit: OH! and i forgot to mention that i used what i learned from this article in the background of my latest vexel. SHAMELESS PLUG :D |
okmissnadine |
"Thank you, Miss Nadine! ~winks and bows" Not a problem.. :P |
| Echoia | Thank you, Miss Nadine! ~winks and bows |
mimi |
Great article! It really helped :D Though when I check the simulate pressure box on mine for some reason it doesn't taper the edges. The line looks the same as if I drew it with the box unchecked! |
| volova | I could't find a way to make absolutly perfect dotted and dashed lines. It was so easy!!!! Thanx. |
| okmissnadine |
[quote Echoia] "Hmm... I wish you hadn't've told them that. I like when people don't know the secrets grrrr ~pouts" [end quote] ^ :P ha ha ha haah...thats mean.. I think you did a wonderful job making tutorials like this to enhance a vexelers sense of style and creativity. Not only did you make a tutorial to "tell secrets", you helped those find their own setting and climax to become a better artist to SHARE tutorials with other later on in the future. Thank you! I will be using this tutorial later on in the future! |
| Echoia | Hmm... I wish you hadn't've told them that. I like when people don't know the secrets grrrr ~pouts |
| jajavi | I just love that people shear their tips... Thank you... |
georgeaye |
haha i didnt know you could use the pen tool by clicking and dragging like that. lol im an idiot. i always make two anchors and then click on the centre of the line press control then drag...>.< thanks for the tip:P |
greenkiwi |
what a helpful article! thank you so much linda ^^ |
| misery | Wow, thanks :) it's really helpful to everyone. I just discovered this about 3 weeks ago :D |
Chloe |
Linda, you are an amazing tutorialist :D I swear, the time it took for you to get all those pictures and stuff (well maybe it took you two seconds, but it's still more work lol) really help. Thank you!! Everything is really clear and easy to follow, and I don't get bored reading it either like some other tutorials with paragraphs that I can never get the main idea of. ;D |
angrod |
Lots of thanks!! This is very useful to me to making hair!! I love this tip! |
| nightsquire | very informative, thanks :) |
acidburnx2 |
This is great Thanks Linda!!! I will try those out and see what happens..... |
Ishtar^_^ |
Thank you Linda!!! Really useful for me!Great article! I will try stroke path!! |
4ngel |
nice! I learnt a few things mostly from the second half of this. :) |
Atramental |
Ahh, I'd forgotten about that little trick! Thanks for reminding me |
SamuraiNinja |
Wow, that really really helps alot alot. Thank you. =] |
| BigDeeZy | man that helped alot lol i didnt know about the beads thing :D thx |
| Stella | I'm going to predict that because of this article, and the massive amount of tips and information you have given us, we'll see a rise in stroke path use. It'll be EVERYWHERE! XD |
| Niels | I knew how to do this, but didn't know the other options, thanks! |
| Patricia |
wow. its really cool. thanks :) |
| Looicy | Hmmmm....quite a cool tip...I wonder is this option available in illustrator?? |
angelica86 |
That tip about makings beads is really interesting! I had no idea about it.. Awesome article :D |
cleavage |
nice! i already knew pretty much everything in here, from other tutorials and just messing around on my own, but it'll be a huge help to people who dont. |
| iris_xx | Very nice, especially the tip about the jewellery, kills me to try that >.< |
| radioslutx | Linda, you're like the best at explaining things. Kyla already introduced me to the stimulate pressure methods etc, but I know that if she hadn't told me, this would have cleared it all up definately. :D |
| Kyla | Stroke path is sex on the beach. I swear by it :) Great article! |
| Photojunkie86 | and here I was trying to do beads individually. *smacks forehead* thanks for the tips, linda. =D |
| IAmTheWalrus | WOW great article, thanks!! I was getting a little sick of stroke-path hair, but now you've used the technique so many different ways. The bead necklace thing is so cool. |